Creating a Relational Database Using Microsoft Access
The objective of this activity is for you to create a relational database using Microsoft Access. Along the way, we will cover a number of topics, including the specification of types, constraints (validation rules), and relationships in a relational database.
- Create the database
- Define each table and the associated fields
- Define the relationships between the tables
- Entering data into the database
- Table Definitions
In brief, these are the major steps to be completed:
- Create an empty database.
- Define each table with the associated fields (attributes) for each table. The definitions include primary keys, validation rules (also called constraints), and other details.
- Define the relationships between the tables. This involves specifying foreign keys (which will be discussed in detail in class).
- Populate the tables with appropriate data.
This assignment was originally written by Dr. Kevin Treu and used in CSC-341: Database Management Systems at Furman University.
Create the database
- Start Microsoft Access 2013. Click the Blank desktop database icon.
- The Blank desktop database panel will be displayed. Name your database by
typing grades-YourInitials into the File Name box at the bottom of the
window. For example, for John Doe the name of the database would be
grades-jd. Click the Create button. - Access may make an assumption about where you want to store you database. Chose File > Save As and navigate to the directory in which you want to save the new database.
- The main database window will be displayed. In the shutter bar on the left, choose “Tables” from the pull-down menu if it’s not already selected.
Define each table and the associated fields
-
Define the Student table first.
There are many different approaches that could be used to create this table. You should feel free to deviate from the technique that will be described if some other approach seems more obvious to you. Also be aware that most mistakes, even design errors, can be corrected easily later. So relax (but not too much).
- Go to the CREATE ribbon and click on the Table button. A generic table “Table1” will be displayed. An empty datasheet view tab will be displayed in the right side panel.
-
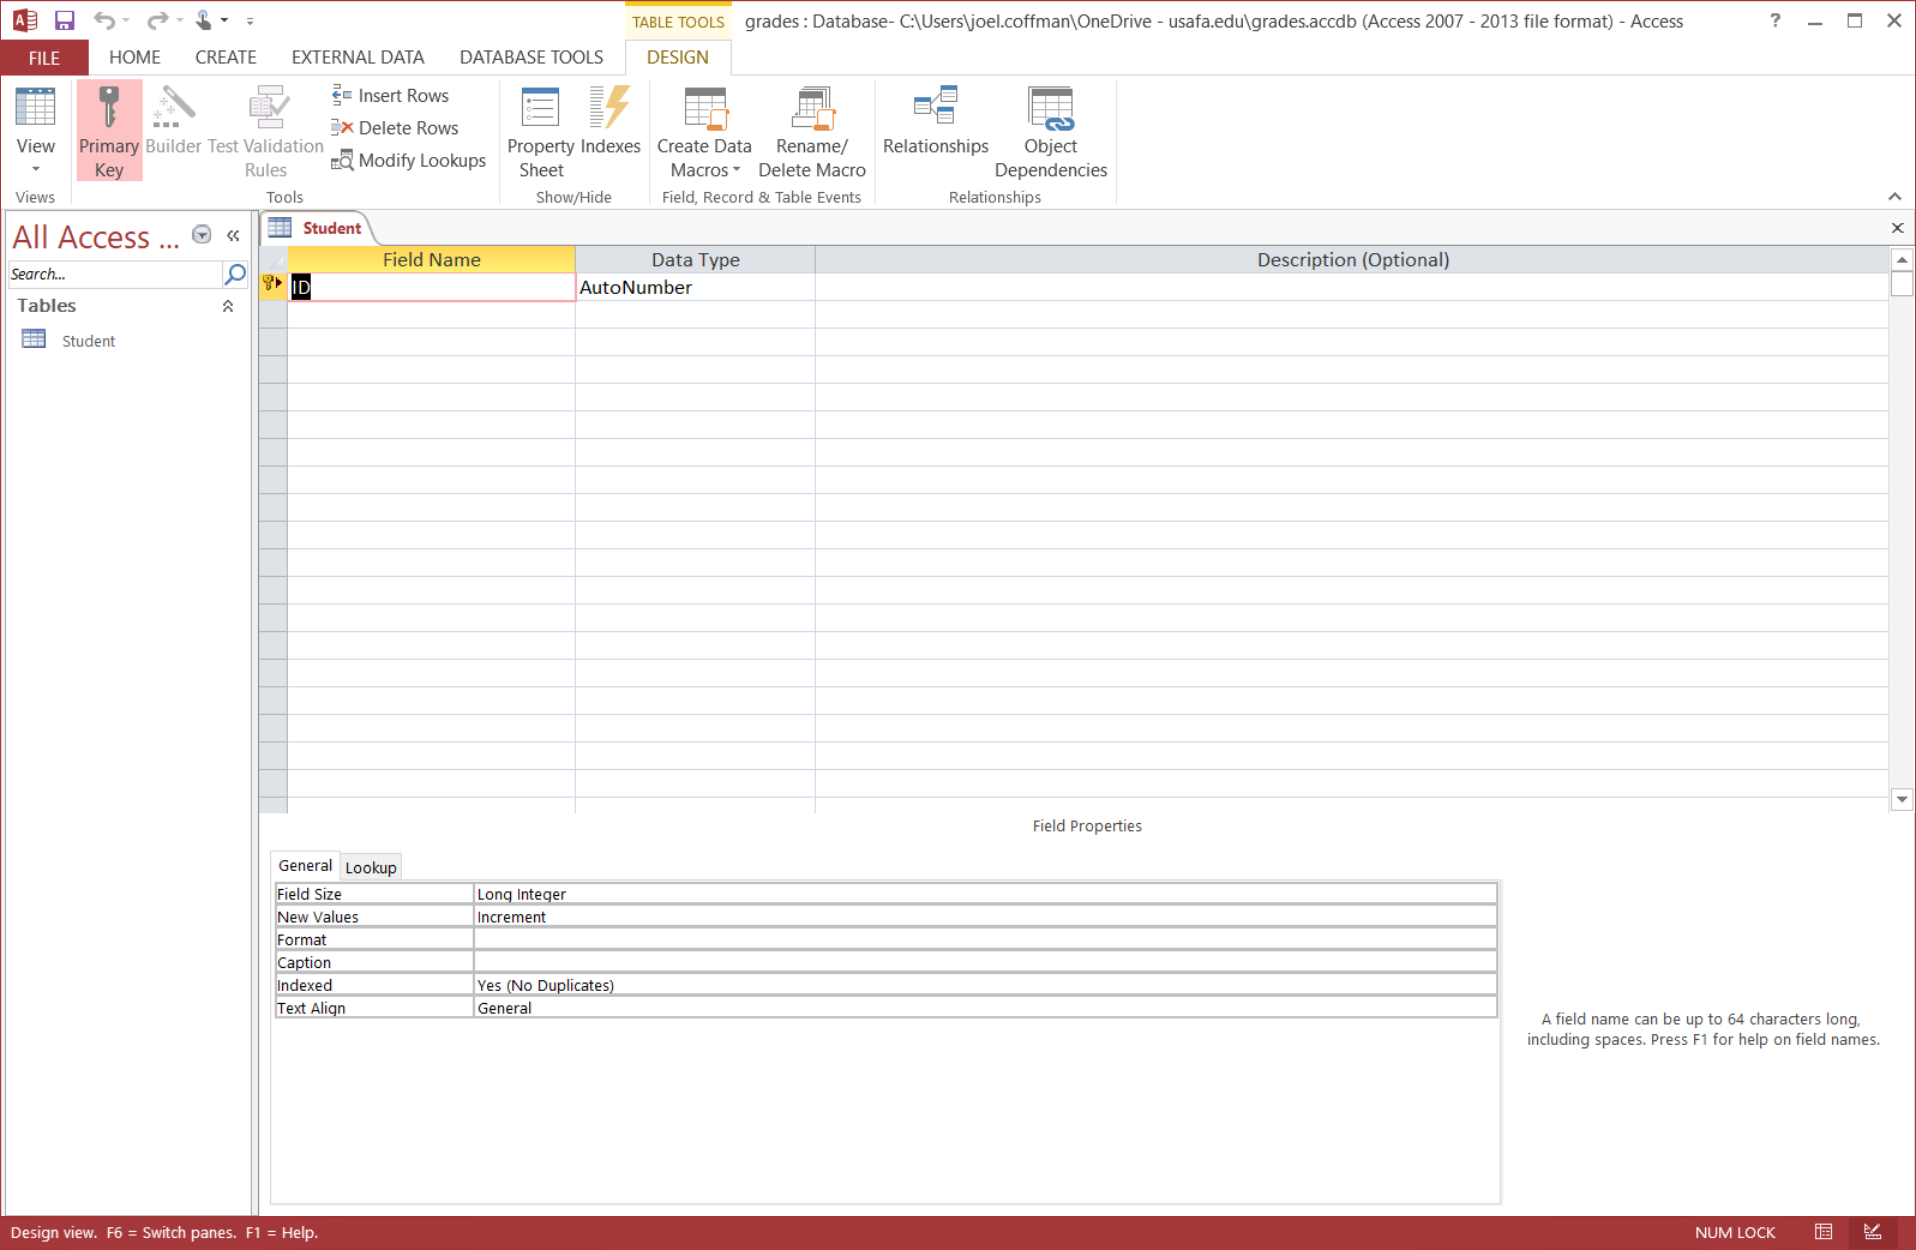
Back in the HOME ribbon, click on the View menu and select Design View. When prompted, name the table “Student”. The Field Definition window will be displayed in the main panel, similar to what is shown below. You will enter information into this box for any given table that you want to define.
When you begin to type the name of a field, an empty Field Properties table will replace a portion of the gray area in the bottom half of the panel. Every field will have its own Field Properties table where validation rules and other properties of each field are specified.
-
Type the name of the first field, SSN. (Overwrite the default “ID” field that has been created for you.) Choose “Short Text” for the Data Type and enter a brief description. Make SSN the primary key for the table by clicking in the gray area at the left edge of the window, which should cause the entire row to become highlighted, and clicking the Set Primary Key button in the Design ribbon. (This field will probably already be set as the primary key.)
- Next, define an input mask. An input mask restricts the format of certain kinds of inputs. First, set the Field Size for SSN to 11, because of the extra characters (in this case, the dashes between each group of digits) needed in the input mask.
-
If you already know the details of the input mask, you can type it directly into the Input Mask row of the Field Properties window. A less error prone technique is to use a wizard to create the input mask. Whenever there is a wizard available for the currently active field, a button containing three dots, …, will be displayed at the right edge of the field.
Use the wizard to create the input mask for SSN. It’s fairly self-explanatory. Use the underscore (“_”) as a placeholder character, and select the option to store the data with the symbols in the mask. (This will simplify the work of creating forms and reports later.) When you are finished, the mask that you create should look like the one in the picture that follows.
- Save the table (and be sure to do so regularly as you complete each step).
- The schema (i.e., specification) for the Student table is given at the
bottom of this page. Complete the table
using these specifications. Some notes and hints:
- Specifying sizes for the text fields should be straightforward.
- “Long Integer” is the default field size for number fields. It would be considered better design to choose “Integer” or even “Byte” when you know you are going to store smaller numbers, but if you make this change, it is critical to remain consistent with the types. As we’ll soon see, certain values in one table are used to link to records in another table, and this won’t work if the types don’t match exactly.
- Use the input mask wizard to specify masks for Zip, Phone, and Birthdate.
- Type the Gender validation rule into the “Validation Rule” box as shown in the record type. This will prevent any value other than “M” or “F” from being entered. You should also add a brief error message in the “Validation Text” box, something like “Value must be ‘M’ or ‘F’”. Likewise with the Class validation rule. (A wizard is also available for validation rules, but it’s often easier to simply type them in if they’re simple.)
- All the fields except for Phone and Major should be required to have a value. This is done simply by setting the value of the “Required” box to “Yes”.
-
Define the Course, Sections, and Grades tables.
- The schema for the Course table is given at the
bottom of this page. Construct this table
using your knowledge of how to set up an Access table, including data
types, sizes, masks, validation rules, etc. Don’t forget to save the
table when finished.
- Use your judgment to determine if a particular field must have a “Required” value or not.
-
Repeat the table definition process for Sections and Grades, using the schemas at the bottom of this page.
The Sections table has a foreign key, our first example of a foreign key. For now, you will enter the name of the field, Cournum, into the table and ignore the fact that it is a foreign key. Later you will use the Relationships window and the field names of foreign keys to describe how the tables are related.
- Note that in order to identify two fields as a combined primary key (necessary in the Grades table), you must make sure both rows are highlighted before clicking the Set Primary Key button.
- The schema for the Course table is given at the
bottom of this page. Construct this table
using your knowledge of how to set up an Access table, including data
types, sizes, masks, validation rules, etc. Don’t forget to save the
table when finished.


Define the relationships between the tables
Relationships between the tables are defined using the Relationships window. Your goal is to reproduce the relations shown below.
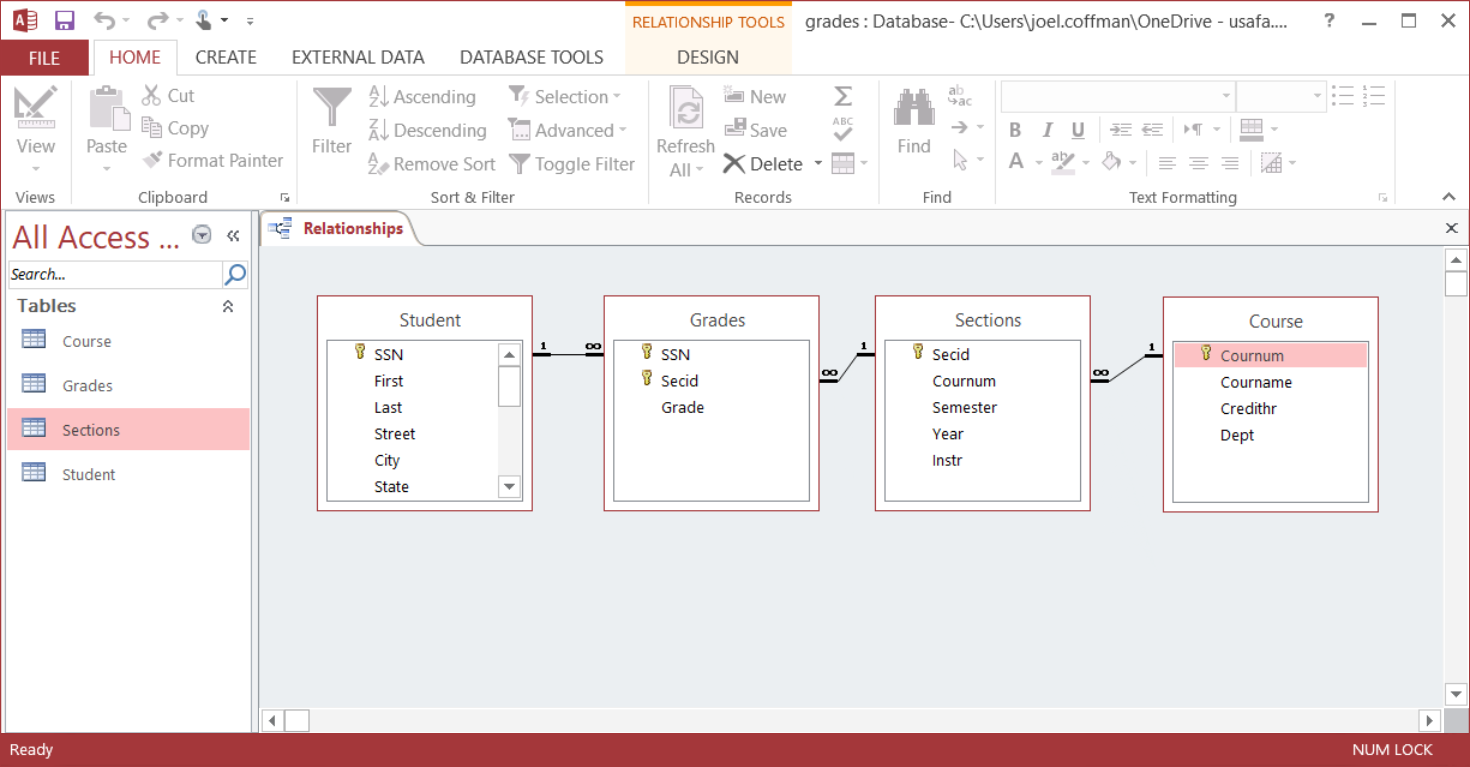
This process will also define the foreign keys specified in the record types. In brief, a foreign key is a field in one table that explicitly links the data in that table to the data in another table. For example, “Cournum” in the Sections table, for example, is a foreign key linking to the “Cournum” field in the Course table.
- Click the relationships button in the Database Tools ribbon. This action should cause the empty “Relationships” panel to be displayed as a new tab along with a “Show Table” window. (If the “Show Table” window isn’t displayed, go to the Design tab under “Relationship Tools” and find the “Show Table” button.)
- Add windows for all the tables you have defined to the Relationships window by repeatedly clicking the Add button in the Show Table window. The order for adding the tables is not important because you can rearrange them by dragging any table diagram by its title to a new location. If necessary, rearrange the tables to create the sequence Student, Grades, Sections, and Course from left to right.
-
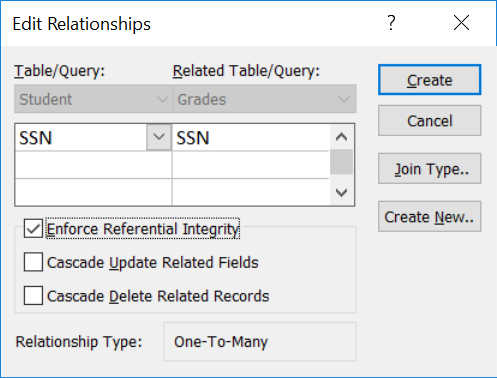
To create a relationship, use the mouse to drag a field from one table to another. For instance, drag the SSN field in Student to the SSN field in Grade. The dragging must always be done from the one-side to the many-side of a relationship. Think of the appropriate business rule in each case and then make the appropriate relationship. The following Edit Relationships dialog will be displayed.
Make sure that only the “Enforce Referential Integrity” box has been checked, to cause automatic testing for referential integrity, but no cascading of updates and deletes. (All of this to be explained later in the course.)
When the Create button is clicked, the relationship with its cardinality ratio is shown in the Relationships window.
- Repeat the above process until all the relationships have been defined.
Entering data into the database
Once the tables have been created to meet the design specification, the database is ready to be populated with data. There are different ways of accomplishing this. Data can be entered manually, it can be imported, and it can be entered as the result of the execution of some database application. We’ll consider only the first two approaches here.
- Manual entry involves simply typing data into the tables. Click on the tab for the Student table if it is still there. If it isn’t, bring up the list of tables in the shutter bar on the left and double-click the name of the Student table. An empty table in datasheet view will be displayed. The column headings will be the names of the fields that you defined earlier.
- Type in a single row of data. You can make it up, or enter your own information. Note how the SSN, Phone, and Zip fields show you the expected format for the data. This format is provided by the input mask.
- Try entering a value other than 1, 2, 3, or 4 for the Class field. Try entering something other than “M” or “F” in the Gender field. What you see is the result of the Validation Rule and the Validation Text that you provided earlier.
- Try leaving blank one of the fields for which a value is required.
- Try entering the same SSN for two different rows.
- If you find that you’ve made a mistake in your table design or definition (during data entry or any other time), you can return to the “design view” in two ways. With the Datasheet View (i.e., the table) displayed, you can execute View > Design View to change the view. Or you can start from the shutter bar, right-click the name of the table, and select “Design View”.
- That’s enough practice with data entry. Delete any rows you’ve created in the Student table and close the table. (Click the X to the right of the tab.) Notice that you’re not asked to save your changes. This is because changes made to your Access database occur in real time. That is, they’re written directly to the database on your hard disk. Unlike Word files, if the power goes out while you’re working, all the data is saved.
- With all of the table tabs closed, go to the External Data ribbon and click Text File in the Import panel. Browse for the files in this order: Student, Course, Sections, and Grades. This order avoids the potential problem of entering data that should reference a field in another table that does not yet contain data – a problem called a violation of referential integrity, which we’ll study again later. For each file, select “Append a copy of the records to the table:” and select the appropriate table. Remember to import the files in the correct order.
- Open each table to make sure the data was imported successfully. In the Student table, click once on the plus sign (“+”) next to one of the student records. How do you interpret the result?
Table Definitions
The information for the following tables assumes that the input masks are to be saved as part of the data in the database.
Student Table Information
- Primary Key
- SSN
- Foreign Keys
- None
| Name of Field | Caption | Data Type | Field Size | Input Mask | Validation Rule |
|---|---|---|---|---|---|
| SSN | SSN | Short Text | 11 | 000\-00\-0000;0;_ | |
| First | First | Short Text | 12 | ||
| Last | Last | Short Text | 12 | ||
| Street | Street | Short Text | 24 | ||
| City | City | Short Text | 12 | ||
| State | State | Short Text | 2 | ||
| Zip | Zip | Short Text | 10 | 00000\-9999;0;_ | |
| Phone | Phone | Short Text | 14 | !\(999”) “000\-0000;0;_ | |
| Major | Major | Short Text | 4 | ||
| Class | Class | Number | Long Integer | =1 Or 2 Or 3 Or 4 | |
| Birthdate | Birthdate | Date/Time | N/A | 99/99/0000;0;_ | |
| Aid | Aid | Yes/No | N/A | ||
| Gender | Gender | Short Text | 1 | =”M” Or “F” | |
| HrsAttempted | HrsAttempted | Number | Long Integer | ||
| HrsEarned | HrsEarned | Number | Long Integer | ||
| QualityPoints | Quality Points | Number | Long Integer |
Course Table Information
- Primary Key
- Cournum
- Foreign Keys
- None
| Name of Field | Caption | Data Type | Field Size | Input Mask | Validation Rule |
|---|---|---|---|---|---|
| Cournum | Course Number | Short Text | 6 | ||
| Courname | Course Name | Short Text | 30 | ||
| Credithr | Credit Hour | Number | Long Integer | =2 Or 4 | |
| Dept | Dept | Short Text | 4 |
Sections Table Information
- Primary Key
- Secid
- Foreign Keys
- Cournum (links to Cournum in the Course table)
| Name of Field | Caption | Data Type | Field Size | Input Mask | Validation Rule |
|---|---|---|---|---|---|
| Secid | Section Id | Number | Long Integer | Between 80 and 100 | |
| Cournum | Course Number | Short Text | 6 | ||
| Semester | Semester | Short Text | 6 | =”Fall” Or “Spring” Or “Summer” | |
| Year | Number | Number | Long Integer | Between 2002 and 2022 | |
| Instr | Instructor | Short Text | 10 |
Grades Table Information
- Primary Key
- SSN and Secid combined
- Foreign Keys
- SSN (links to SSN in Student table)
- Secid (links to Secid in Sections table)
| Name of Field | Caption | Data Type | Field Size | Input Mask | Validation Rule |
|---|---|---|---|---|---|
| SSN | SSN | Short Text | 11 | 000\-00\-0000;0;_ | |
| Secid | Section Id | Number | Long Integer | Between 80 and 100 | |
| Grade | Grade | Short Text | 1 | =”A” Or “B” Or “C” Or “D” Or “F” |